Categories
articles How To

Computer Won’t Startup – Freezes on Bootup

You may have a problem with your Apple or Windows computer where you startup the computer and it will hang on startup. With Windows computers, this may happen immediately after the POST (power on self test screens). With an Apple computer, this may happen before you see the Apple icon at startup.

This problem can be caused by a faulty USB device or USB Hub. For example, some connected hard drives may result in the system hardware attempting to identify the drive, or possibly scan the drive to determine its configuration. Multi-function devices can be perceived as external drives of they have memory card readers.

Try unplugging all unnecessary USB devices, then startup the computer, and then connect the devices again. This may speed up the startup process.

Something else that may slow down the startup process are synchronization applications for services like Dropbox, Box, Google Drive, and Microsoft OneDrive. Try configuring these mini-apps to not load at startup. That will likely speed up the startup process. You may want to choose just one synchronization drive service.

Categories
articles How To

Neat Scanner Software Update to 4.0.3 for Apple Mac – “The update is locked with a password.”

If you’re updating the Neat scanner software to the 4.0.3 version, you may receive a message stating “The update is locked with a password.”

This message is misleading.

On Apple computers, sometimes software installations or updates will require the username and password of an administrator account. In this case, the password being requested is your computer user password (the password you might type to login to your computer).

So, the software update isn’t locked as the error message suggests. It simply needs authentication and permission to install.

Categories
articles How To

External Hard Drives and Software for Computer Backups

20131121th-external-drives-software-computer-backups-960x540

Windows Backup Software. The backup software included with Windows 7 will backup your data files as well as making an initial image backup of the computer if  you need to restore from a complete system crash. Purchase one of the hard drives listed below, connect it to your computer, then start the backup software by going to the start menu and searching for backup. If this is the first time you’ve run the software, you’ll be guided through the setup. If you’ve already configured the backup previously to another drive, click on the link to change settings, and choose your new external drive as the backup drive. If your computer crashes, you can restore your programs, settings, and files with a full Windows backup.

Cloud Backup Services. An inexpensive alternative to running your own backups is to pay about $60 per year for Carbonite backup service. This will backup all of your data files over the Internet to an off-site remote service. They can be retrieved on another computer if yours crashes. This isn’t a full image backup, so restoring your computer and software will take more time if you only have a data backup.

Cloud File Services. If you’re primarily concerned about having your critical data files backed up, a service like Box.com can synchronize a folder on your computer and store it in the cloud. They can then be accessible from multiple computers, including mobile devices. The cost ranges from $60 a year (100GB) up to $180 a year (1000GB) or more depending on how much data you want stored in the cloud.

Third Party Backup Software. Many hard drive manufacturers offer backup software such as Western Digital Smartware or Seagate Backup Plus. It’s also possible to purchase backup software such as Acronis or download free software such as EaseUS Todo Backup.

Apple Computer. For anyone using an Apple computer, setting up a backup system is fairly easy. Simply purchase an external drive, plug it in, and respond “Yes” when prompted if you’d like to use the drive for backups. If needed, the drive will be formatted (erased) to be optimized for working with Apple. The included Apple Time Machine backup software automatically configures itself.

Hard Drives

The following drives are good choices for backing up computers. Choosing a drive that doesn’t require an external power supply (power cord) is wise because this reduces the chances of a component failure. The Western Digital drives come with backup software. However, you may choose to use the Windows software instead. The prices listed are current as of the time of this article.

Categories
articles How To

Disable TeamViewer From Loading Automatically When Starting Windows

20100304th-teamviewer-iphone-remote-access-control-computer-support-training

TeamViewer is one of the world’s most secure and trusted remote access programs. Yet, with any remote access software, unless there is an ongoing need for regular maintenance and support, it’s best to only use the software when needed.

The instructions below will guide you through ensuring that TeamViewer is not configured to automatically run when you start your computer. These instructions are for Windows computers.

1. Start TeamViewer if it isn’t running already. Once TeamViewer is running, you should see the small blue TeamViewer icon in the system tray as seen in the middle below.

2. Right click on the TeamViewer icon to display the context sensitive menu as seen below.

3. Click on Options from the menu. In the resulting window, remove the checkmark (if it exists) to the left of the Start TeamViewer with Windows option. This option is for unattended access. Once done, click the OK button.

4. Right click on the TeamViewer icon again, and this time choose Setup attended access.

5. The following window will appear. Click Next.

6. In the password window, make sure no password is entered (unless you’re planning unattended remote access). Click Next.

7. A confirmation window will appear. Click the Skip password button.

8. The following window will appear. Choose the option I don’t want to create a TeamViewer account now. Then click the Next button.

9. The final window will show the computer’s unique TeamViewer ID. This number remains the same. The password will be randomly generated each time the software is started. Click the Finish button.

10 The TeamViewer software will still be running. To close it completely, right click on the TeamViewer icon in the system tray and choose Exit TeamViewer.

Update: 31 March 2015

Recent versions of TeamViewer may not have the ability to disable it from loading on startup. In such cases, removing the software might be the best solution. Then, install the TeamViewer QS version for occasional use.

Worldwide Interest

Due to many people having questions about how to enable and disable the autorun feature, this article has been very popular. The maps below show recent visitors to this page. Click any map for a larger gallery view.

Categories
articles How To

Getting Around the Box.com Upload File Size Maximum Limitation

20130805mo-box-dot-com-cloud-storage

Problem. For users at the free “personal” level, Box.com has a 250MB limit on the size of a file you can upload using their web interface. You can upgrade your account to the $15 per month plan to upload files of up to 2GB in size. However, those lucky enough to have received the 50GB of storage free-for-life plan will want to avoid getting locked into paying $180 a year just to upload the occasional large file.

Solution. If you use the Box.com synchronization feature, the 250MB limit isn’t an issue. So, you can upload those occasional large files and retain your free membership level.

Update. The above work-around was previously an option. However, as of August 2013, Box.com will not synchronize files of a size that exceed your plan’s upload file size limit.

Categories
articles How To

FCC Shortwave Ham Amateur Radio License Renewal Online

20130803sa-fcc-amateur-radio-license-online-renewal-instructions

Within a few months prior to expiration, it is possible to renew a shortwave radio license (also known as amateur radio or ham radio). The FCC has a Universal Licensing System (ULS) that permits online renewal and updating of license information. Follow these steps to perform a renewal.

  1. Visit the Universal Licensing System page.
  2. Click on the option for Online Filing Log In.
  3. You will need your FCC Registration Number (FRN) and password to login. If you’ve lost these, you can click the Forgot Password link on the ULS page (see step #1 above) to be walked through the process of password recovery. It may require waiting for a reset letter in the mail from the FCC. More is explained on the Online Filing Log In page.
  4. Once logged into the License Manager (from step #3 above), you should see a message stating “This License Is Eligible For Renewal” and a link to Begin the renewal process.

Note: Your browser may at some point get stuck during the process of going from one step to the next. If this happens, you may need to clear your browser cache and cookies to start over fresh.

Categories
How To

Default Save to iCloud Configured for Apple OS X 10.6.4 Mountain Lion

The default location for saving iWorks documents is the iCloud in Mountain Lion when Documents are set as being synchronized to the iCloud.

To change this, go to Terminal (in Utilities) and paste in the following command:

defaults write NSGlobalDomain NSDocumentSaveNewDocumentsToCloud -bool false

Then press Return. Then type exit. When you restart the iWorks applications they will default to the folder of your choice.

Categories
articles How To

The Evolution of Address Books and Contact Lists

20130627th-contacts-evolution

Summary. Technological advances and convergence has impacted how we think of and use address books and contact lists. The chronology below is somewhat of an oversimplification. Convergent devices and software existed early on, but were not as widely embraced and utilized as they are today. So, with a simple

1970s Address Book

20130627th-contacts-evolution-retro-vintage-address-booksIn the 1970s, prior to the wider use of computerized devices, it was common to have a single printed or handwritten address book.

This centralized address book would contain all the contact information needed for all people and businesses you frequently needed to contact.

One might even put their account number and other pertinent information in this address book as well.

Entries might be hand written or typed using a typewriter for those wanting a cleaner look.

1980s Address Book

With the introduction of computers and electronic address books, people began typing their address lists into electronic devices. For early adopters of online computing, this may have included a separate electronic directory of people’s contact information. Fax machines with internal memory would have an electronic directory of fax numbers. Telephones had their own built-in electronic directories. Because these different devices didn’t communicate with each other, it was common to have one’s address book scattered around various devices. If a person moved, and updated their email, phone, fax, and mailing address. It would be necessary to update this information on multiple devices.

1990s Address Book

In the 199s, the devices of the 1980s became more advanced. From decade to decade technologies changed, but the list below reflects the broader social use of these technologies.

  1. Fax Machine. Most of us have had Fax machines, and these have had an internal directory of names and fax numbers. Needless to say, no other information was contained beyond just the fax number and a name.
  2. Telephone. It was common to have a telephone directory either as a rolodex or address book near the telephone. At some point this printed directory moved to an internal listing inside our mobile phones. This list contained usually just a name and phone number. More advanced phones allowed for home and business phone numbers for an individual.
  3. Mailing List. Since most of us needed to communicate to a group of people by postal mail, it was common to have a directory in a computer with names and addresses. This could be used to print labels, print envelopes, and/or perform mail merge using Microsoft Word and Excel. The mailing list later became an email distribution list.
  4. Email Program. With the increased use of email, we began to develop directories of email addresses. These would usually have people’s names and email addresses only.

Microsoft Outlook 2000

Microsoft Outlook was one of the first widely adopted programs to integrate all of the above functions: fax sending, emailing, and mail merge. One could also print their telephone directory. Included with Office 2000 and subsequent versions of Office, Outlook became a commonly used program. Increasingly, electronic devices (like the Palm) would include the ability to synchronize with Outlook. So, you could take a synchronized version of your entire address book with you. This was helpful, for example, when traveling to someone’s home or business, you could double-check their address. Or, if needing to call someone, you’d have their information with you. Similarly, information entered into a Palm device, would later be pushed into Outlook on the computer when synchronized. People soon realized the benefits of having a single synchronized unified address book (as we’d had in the past).

PRESENT DAY…

With smart phones, now people are calling, emailing, and otherwise communicating in multiple forms with people. We expect our computer and phone to have email, phone number, fax number, and physical address (for mapping). We’re updating and adding data while mobile, to phones, tablets, and computers. The “cloud” makes it possible to synchronize without using wires, but in all other respects, the process remains the same.

Categories
How To Uncategorized

Configuring iPhone Notification Settings to Receive Emergency Alerts from Government Agencies

The graphic below shows how to set your iPhone Notifications to receive emergency alerts from government agencies. Click here or the image below to enlarge.

20130624mo-iphone-emergency-alert-settings

Categories
How To

Using MailChimp to Send an Email or Newsletter to a Distribution List or Group of People

20130624mo-mailchimp

Summary. Communicating with smaller groups of people can be done using standard email services (Gmail, Hotmail, Yahoo) and, if you desire, additional software can be used (Thunderbird, Outlook, Apple Mail). Most of these have a “group” capability in their address book or contacts list, and they allow for sending a single email to a few dozen people. However, with larger lists, it’s necessary to use an email distribution system or service for the reasons mentioned below. This document describes why you’ll want to use MailChimp, and describes how it works. Effective email distribution is a little bit complicated to get setup. This is why you may want to have assistance from someone skilled with the process. Contact us if you need additional help.

Overview. Before you get intimidated, here’s a simple overview of how MailChimp and other email distribution systems work.

  1. Setup a mailing list. An existing list can be imported, or you can start from scratch.
  2. Create a message or newsletter to send people (this is called a “campaign” in MailChimp).
  3. Send your message.

That’s all there is to it. The rest of this document describes the above process in more detail, and also explains why email distribution systems are necessary. The instructions here are specific to MailChimp, but apply to just about any service. The screen images used here are current as of June 2013 after a redesign to the MailChimp system. However, they may not be accurate a year from now. So, it’s important to focus on learning the general process and develop the intuitive skills required.

Problems With Group Mailings. As you approach 30 or more recipients for a single email, several problems can arise if  you try to send that message using traditional email methods.

  • Your email service provider may suspect you of sending SPAM (unsolicited junk emails) and this could result in your account getting shut down or temporarily frozen.
  • When people receive an email with a long list of recipients, they are less likely to consider it personally relevant to them. It will be perceived as impersonal and likely to be junk mail.
  • Messages with large numbers of recipients are perceived by Junk Mail Filtering systems to be SPAM. So, your message may be blocked and the recipients may not receive it.
  • Managing a list can be time consuming. People frequently change their email addresses. People who are in your list want off. Others want to be added. Delays and typos create further problems.

Benefits of Email List Services. Email distribution systems resolve all of the above problems, and offer additional benefits. For example, some can tell you how many people read your email message. Also, your messages can be formatted to be more attractive.

Email List Service Options. There are several ways to communicate with groups of people. For an example, see the Iowa City Scrabble Club subscribe page. On that page you’ll see the following five methods used. They are described here briefly.

  • MailChimp.  An email subscription system that allows the use of existing lists, and also provides a signup form for new subscription requests. Messages are composed and sent from within your MailChimp account. The drag and drop interface makes it easy to create a fancy newsletter. The service is free for those with smaller lists who send out fewer messages weekly or monthly. The paid MailChimp service levels are similar to those offered by CreateSend.ie or Constant Contact.
  • Facebook. Having a Facebook page is one way to reach people. However, there’s no guarantee that they will see your message unless they visit your page, or happen to be on Facebook when you post an announcement.
  • Twitter. Like Facebook, Twitter isn’t a reliable way to communicate with people. Since people may be reading through many Tweats that scroll by on their news feed, they may miss your postings.
  • Yahoo Groups. Similar to MailChimp, Yahoo Groups lets you import an existing list of email addresses (up to 100 per day). There are also additional collaborative tools.
  • WordPress.com Subscription. This option lets you email website posts by email. Since all posts are distributed, it may be best to setup a dedicated WordPress.com subscription website for monthly newsletters (for example). However, it’s not necessary. If your website followers are sufficiently interested, they will appreciate getting all posts in real-time.

What MailChimp Does. MailChimp is really several services in one: (1) mailing list manager, (2) email composer, (3) email sender. It’s logical to have all these combined in one service. Yet, in the past, it was common for a person to manage their email list in a spreadsheet, create their newsletter using Publisher, and send it using an email service provider. That was a lot of work. Having all of these functions in one place makes things easier.

Mailing List and MailChimp. For most mailing list needs, a single mailing list will be imported or started from scratch. The ongoing maintenance of the list will be done automatically through signup/subscribe forms and unsubscribe requests.

  1. To get started, once logged into MailChimp, you’ll create a list for the first time. Skip this step if someone has already done it for you. Otherwise, go to step #2.
  2. Go to Lists and click on Create List. When you create your list, you’ll be asked to give it a name and you’ll provide other default information for use later when sending.
    1. Note: Unless you’re managing multiple lists for multiple groups, you’ll probably just have one list. In fact, it’s probably best to have separate MailChimp user accounts for different lists, since the free MailChimp service restricts the size of lists to 2000 people or less and the number of mailings are also limited. This also makes it possible to delegate the work of a certain list to another person (although multiple user accounts are also available).
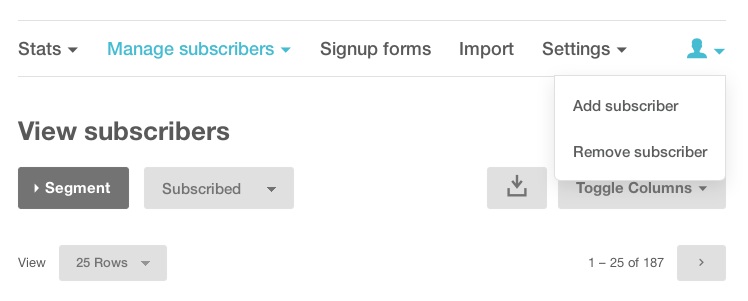
  3. After creating your (initially empty) list, you can begin to add email addresses to it either by importing or adding one at a time. From the Lists page, click on your list to see the management options. In the upper right corner, you’ll see a silhouette of a person. Hover your mouse to reveal the Add Subscriber option as shown below. Click here or the image for a larger view.

20130624mo-mailchimp-add-subscriber

Once you click Add Subscriber, you’ll get a form like the one shown below. You can use this form to enter people one at a time.

20130624mo-mailchimp-add-subscriber-form

If you have an existing list, import the list from your computer. Go to the main Lists page, click on the List name, click Import, and follow the instructions.

Letting People Subscribe. Most lists are built over time when people Subscribe to your list (called opt-in). You can send people to a subscription page for your MailChimp mailing list by following these steps:

  1. Go to the main MailChimp Dashboard.
  2. Select Lists.
  3. Click on the list name.
  4. Click on Signup Forms
  5. Click on Link to a Form
  6. Customize, or just click Click Share It
  7. Copy the short URL that will send people to your form. It should begin with http://eepurl.com/
  8. When people go to that link, they will be able to signup for your list. You can send that link out by email and even share it on a website.

Creating a Newsletter or Email. Follow these steps to create a newsletter or email.

  1. Go to the main MailChimp Dashboard
  2. Click on Campaigns (these are like newsletters)
  3. If you’ve had a previous campaign similar to what you want to create now, then from the drop-down arrow/triangle on the right, choose replicate. Otherwise, click on Create Campaign.
  4. Choose who the message will go out to. Usually it’s your entire list.
  5. Give the campaign a name. You might consider using YYYYMMDD-name as a format. So, a newsletter being sent on June 24, 2013 would be called 20130613-newsletter. Fill out or customize any of the other settings as needed then click Next.
  6. Choose a Template. Drag & Drop editor works well, so choose that.
  7. Select a Template by clicking on Basic Templates. Select One Column.
  8. Fill out all areas of the initial sample template. In the upper right corner, you’ll see “Use this area to offer a short preview of your email’s content.” Click on that text to put a custom message or link (like a link to your Facebook page).
  9. You can click and drag any element from the right to your newsletter on the left. Click on any existing placed element to edit it.
  10. Click Next. A text only message will be created from what you designed above. If you’ve replicated a previous campaign, the previous text message will be here, so be sure to update it by clicking on Copy Text From HTML Email.
  11. Click Next and review all of your choices and selections.
  12. At the top of the page, under Preview & Test,  you’ll find an option to Send a Test Email. Choose this option to make sure your email will look okay.
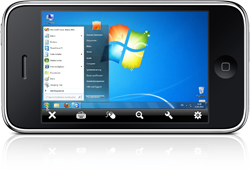
  13. View your message (the test message) on a desktop/notebook computer as well as other devices like a tablet/iPad and smartphone/iPhone.
  14. Once you’ve confirmed everything is okay, click Send Now.

The above steps are detailed and may look a bit intimidating. However, once you’ve done this a few times, you’ll see that it’s simply a matter of replicating and then modifying previous campaigns. So, sending a simple newsletter can be almost as easy as sending a normal email.

Contact us if you have a suggestion for how the above instructions can be made clearer.

20130624mo-new-mailchimp-logo